 Balinder Walia
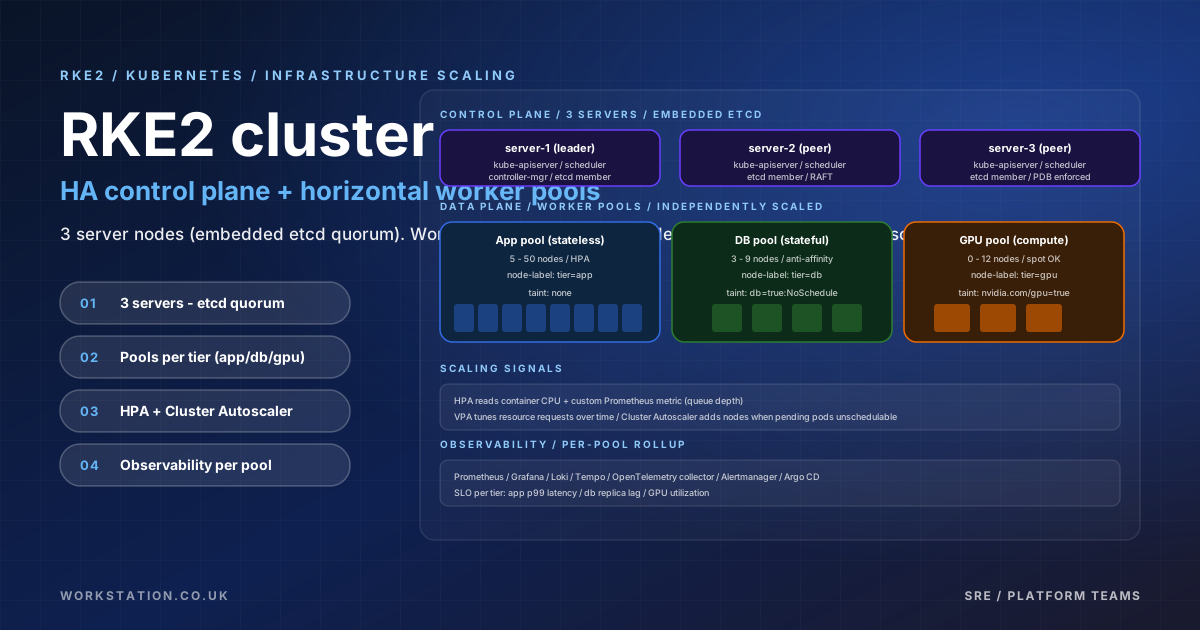
在生產環境中執行 Kubernetes 叢集是一回事。執行一個能夠吸收不可預測的流量峰值、在控制平面故障中倖存、強制租戶隔離並讓您的運營團隊清楚地瞭解系統每一層的網路——這是一項完全不同的挑戰。 RKE2 是 Rancher 的下一代 Kubernetes 發行版,專為那些要求不可協商的環境而構建。
本文涵蓋了生產級 RKE2 部署的整個生命週期:初始叢集架構、Pod 和節點級別的自動縮放、高可用性控制平面、資源治理以及 Prometheus 和 Grafana 的可觀察性。
為什麼選擇 RKE2?
RKE2 在三個關鍵領域區別於上游 Kubernetes 及其前身 RKE1。首先,它配備了開箱即用的 CIS Kubernetes 基準強化配置 - 准入控制器、稽核日誌記錄、pod 安全性和 TLS 設定已預先配置為透過 CIS 1 級掃描,無需手動干預。其次,它符合 FIPS 140-2 標準,適合政府和受監管行業的部署。第三,它直接嵌入 Containerd 並附帶自己的 CNI(Canal 或 Cilium,具體取決於您的配置選擇),減少了您需要管理的外部依賴項的表面積。
RKE2 也適合氣隙。安裝捆綁包包括所有必需的容器映像,這在本地和邊緣部署中非常重要,因為叢集節點的網際網路訪問受到限制或不可能。
叢集架構
生產 RKE2 叢集分為伺服器節點(執行控制平面和 etcd)和代理節點(執行工作負載)。為了實現高可用性,建議的拓撲是三個或五個伺服器節點以及按工作負載類組織到節點池中的可變數量的代理節點。
# /etc/rancher/rke2/config.yaml (server node)
token: <shared-cluster-token>
tls-san:
  - 10.0.0.10          # VIP or load balancer address
  - k8s.internal.example.com
cni: cilium
cluster-cidr: 10.42.0.0/16
service-cidr: 10.43.0.0/16
etcd-expose-metrics: true
kube-apiserver-arg:
  - "audit-log-path=/var/log/kubernetes/audit.log"
  - "audit-log-maxage=30"
  - "audit-log-maxsize=100"
# /etc/rancher/rke2/config.yaml (agent node)
server: https://10.0.0.10:9345
token: <shared-cluster-token>
node-label:
- "workload-class=general"
- "topology.kubernetes.io/zone=eu-west-1a"在第一個控制平面節點上安裝伺服器,然後使用相同的令牌和 VIP 地址加入其餘伺服器節點和所有代理節點。 RKE2 自動選舉 etcd 領導者並管理法定人數。
# Install and start RKE2 server
curl -sfL https://get.rke2.io | INSTALL_RKE2_TYPE=server sh -
systemctl enable --now rke2-server.service

# Retrieve the node token for joining additional nodes
cat /var/lib/rancher/rke2/server/node-token

# Install and start RKE2 agent (on worker nodes)
curl -sfL https://get.rke2.io | INSTALL_RKE2_TYPE=agent sh -
systemctl enable --now rke2-agent.service
節點池和工作負載放置
並非所有工作負載都具有相同的資源配置檔案。無狀態 Web 服務與 GPU 推理作業、記憶體密集型分析工作負載或延遲敏感資料庫具有不同的要求。將代理節點組織到具有不同標籤和汙點的池中,讓 Kubernetes 將每個工作負載類別安排到適當大小的硬體上。
# Label a node pool for memory-intensive workloads
kubectl label nodes worker-mem-{1..4} workload-class=memory-optimised
kubectl taint nodes worker-mem-{1..4} workload-class=memory-optimised:NoSchedule

# Label a separate pool for general compute
kubectl label nodes worker-gen-{1..8} workload-class=general
# Deployment targeting the memory-optimised pool
apiVersion: apps/v1
kind: Deployment
metadata:
name: analytics-engine
spec:
template:
spec:
nodeSelector:
workload-class: memory-optimised
tolerations:
- key: workload-class
operator: Equal
value: memory-optimised
effect: NoSchedule
containers:
- name: analytics
image: registry.internal/analytics:v2.3.1
resources:
requests:
memory: "8Gi"
cpu: "2"
limits:
memory: "16Gi"
cpu: "4"水平 Pod 自動縮放器
Horizontal Pod Autoscaler (HPA) 根據觀察到的指標調整 Deployment 或 StatefulSet 的副本計數。 CPU 利用率是經典的觸發器,但現代 HPA 配置還可以根據應用程式公開的自定義指標或訊息佇列深度等來源的外部指標進行擴充套件。
首先,確保 Metrics Server 正在執行 — RKE2 預設情況下不捆綁它。
kubectl apply -f https://github.com/kubernetes-sigs/metrics-server/releases/latest/download/components.yamlapiVersion: autoscaling/v2
kind: HorizontalPodAutoscaler
metadata:
name: api-server-hpa
namespace: production
spec:
scaleTargetRef:
apiVersion: apps/v1
kind: Deployment
name: api-server
minReplicas: 3
maxReplicas: 20
metrics:
- type: Resource
resource:
name: cpu
target:
type: Utilization
averageUtilization: 65
- type: Resource
resource:
name: memory
target:
type: Utilization
averageUtilization: 70
behavior:
scaleDown:
stabilizationWindowSeconds: 300 # wait 5 minutes before scaling down
policies:
- type: Percent
value: 25
periodSeconds: 60
scaleUp:
stabilizationWindowSeconds: 0
policies:
- type: Percent
value: 100
periodSeconds: 30behavior模組對於穩定性至關重要。如果沒有縮小的穩定視窗,短暫的流量下降就會過早地刪除 Pod,從而在負載恢復時導致資源配置不足。非對稱策略(積極擴大規模,保守縮小規模)是大多數生產工作負載的正確預設策略。
垂直 Pod 自動縮放器
垂直 Pod 自動縮放器 (VPA) 根據觀察到的使用情況調整 CPU 和各個 Pod 上的記憶體請求的大小。它解決了一個常見問題:開發人員根據猜測設定初始資源請求,而這些值永遠不會更新,從而導致浪費的過度配置或負載下的 OOMKilled pod。
apiVersion: autoscaling.k8s.io/v1
kind: VerticalPodAutoscaler
metadata:
  name: worker-vpa
  namespace: production
spec:
  targetRef:
    apiVersion: apps/v1
    kind: Deployment
    name: background-worker
  updatePolicy:
    updateMode: "Auto"     # or "Off" to only view recommendations
  resourcePolicy:
    containerPolicies:
      - containerName: worker
        minAllowed:
          cpu: 100m
          memory: 256Mi
        maxAllowed:
          cpu: 4
          memory: 8Gi
controlledResources: ["cpu", "memory"]請注意,Auto模式下的 VPA 將逐出並重新啟動 Pod 以應用新的資源值。對於無法中斷正在進行的請求的服務,請在Off模式下執行 VPA 以生成建議,您可以在維護時段手動或透過 GitOps 工作流程應用這些建議。
重要提示:HPA 和 VPA 不應同時管理同一部署上的同一資源(CPU 或記憶體)。使用 HPA 進行 CPU 驅動的水平擴充套件,使用Off模式下的 VPA 來調整記憶體大小,或者使用KEDA進行需要細粒度控制的事件驅動擴充套件。
叢集自動縮放器
Pod 自動縮放器在現有節點容量內工作。當該容量耗盡時(由於沒有節點擁有足夠的資源,pod 被困在Pending中),您需要 Cluster Autoscaler 來配置新節點。相反,當節點利用率明顯不足時,Cluster Autoscaler 可以耗盡並停用它們,以降低基礎設施成本。
在裸機或本地部署中,叢集自動縮放器與您的基礎設施配置層整合。對於雲部署,AWS、GCP 和 Azure 等提供商提供本機節點組整合。以下示例顯示了 AWS Auto Scaling 組的核心配置。
apiVersion: apps/v1
kind: Deployment
metadata:
  name: cluster-autoscaler
  namespace: kube-system
spec:
  template:
    spec:
      containers:
        - name: cluster-autoscaler
          image: registry.k8s.io/autoscaling/cluster-autoscaler:v1.29.0
          command:
            - ./cluster-autoscaler
            - --cloud-provider=aws
            - --nodes=2:10:k8s-general-worker-asg
            - --nodes=1:4:k8s-memory-worker-asg
            - --scale-down-delay-after-add=10m
            - --scale-down-unneeded-time=10m
            - --scale-down-utilization-threshold=0.5
            - --skip-nodes-with-local-storage=false
            - --expander=least-waste
          env:
            - name: AWS_REGION
value: eu-west-1--expander=least-waste選項告訴自動縮放器在容納掛起的 Pod 後優先選擇具有最少未使用資源的節點組,從而最大限度地降低成本。替代擴充套件器包括random、most-pods和priority。
高可用性控制平面
具有嵌入式 etcd 的三節點控制平面是最小可行的 HA 拓撲。 etcd 需要法定人數——大多數成員必須健康,叢集才能接受寫入。三個人可以容忍一次失敗;有五個成員,你可以容忍兩個。
控制平面節點必須位於負載平衡器後面。對於雲部署,針對埠 6443(kube-apiserver)和 9345(RKE2 註冊)的 TCP 負載均衡器效果很好。本地部署通常使用帶有虛擬 IP 地址的 keepalived。
# keepalived.conf on control-plane nodes
vrrp_instance VI_1 {
    state MASTER        # BACKUP on the other two nodes
    interface eth0
    virtual_router_id 51
    priority 100        # 90 and 80 on the other two nodes
    advert_int 1
    authentication {
        auth_type PASS
        auth_pass securepassword
    }
    virtual_ipaddress {
        10.0.0.10/24    # VIP used in tls-san and agent server address
    }
}
在任何控制平面操作後驗證 etcd 是否正常。 RKE2 將etcdctl捆綁在/var/lib/rancher/rke2/bin/etcdctl上。
ETCDCTL_API=3 /var/lib/rancher/rke2/bin/etcdctl \
  --endpoints=https://127.0.0.1:2379 \
  --cacert=/var/lib/rancher/rke2/server/tls/etcd/server-ca.crt \
  --cert=/var/lib/rancher/rke2/server/tls/etcd/client.crt \
  --key=/var/lib/rancher/rke2/server/tls/etcd/client.key \
  endpoint health --cluster
資源配額和限制範圍
在多租戶叢集中(不同的團隊或應用程式共享相同的物理基礎設施)ResourceQuotas 和 LimitRanges 是必不可少的護欄。 ResourceQuotas 對名稱空間內的總資源消耗設定硬性上限。 LimitRanges 為各個容器設定預設值和最大值,防止配置錯誤的部署請求無限制的資源。
apiVersion: v1
kind: ResourceQuota
metadata:
  name: team-alpha-quota
  namespace: team-alpha
spec:
  hard:
    requests.cpu: "20"
    requests.memory: 40Gi
    limits.cpu: "40"
    limits.memory: 80Gi
    count/deployments.apps: "20"
    count/services: "15"
    persistentvolumeclaims: "10"
    requests.storage: 500Gi
apiVersion: v1
kind: LimitRange
metadata:
name: team-alpha-limits
namespace: team-alpha
spec:
limits:
- type: Container
default:
cpu: 500m
memory: 512Mi
defaultRequest:
cpu: 100m
memory: 128Mi
max:
cpu: "8"
memory: 16Gi
- type: PersistentVolumeClaim
max:
storage: 100Gi應用 LimitRanges 可確保忘記指定資源請求的開發人員仍然獲得合理的預設值,而不是請求零 CPU,否則會導致排程程式將 Pod 放置在任何位置,並可能導致同一節點上的其他工作負載匱乏。
使用 Prometheus 和 Grafana 進行監控
Kubernetes 叢集中的可觀測性具有三個支柱:指標、日誌和跟蹤。 Prometheus 處理指標收集; Grafana 處理視覺化。kube-prometheus-stackHelm 圖表在單個命令中部署整個堆疊 — Prometheus Operator、警報管理器、Grafana、節點匯出器和一套全面的預構建儀表板。
helm repo add prometheus-community https://prometheus-community.github.io/helm-charts
helm repo update

helm install kube-prometheus-stack prometheus-community/kube-prometheus-stack \
  --namespace monitoring \
  --create-namespace \
  --set prometheus.prometheusSpec.retention=30d \
  --set prometheus.prometheusSpec.storageSpec.volumeClaimTemplate.spec.storageClassName=longhorn \
  --set prometheus.prometheusSpec.storageSpec.volumeClaimTemplate.spec.resources.requests.storage=100Gi \
  --set grafana.adminPassword=<secure-password> \
--set alertmanager.alertmanagerSpec.storage.volumeClaimTemplate.spec.resources.requests.storage=10Gietcd-expose-metrics: true時,RKE2 會公開 etcd 指標。新增 ServiceMonitor,以便 Prometheus 抓取它們。
apiVersion: monitoring.coreos.com/v1
kind: ServiceMonitor
metadata:
  name: rke2-etcd
  namespace: monitoring
  labels:
    release: kube-prometheus-stack
spec:
  namespaceSelector:
    matchNames: [kube-system]
  selector:
    matchLabels:
      app.kubernetes.io/name: rke2-etcd
  endpoints:
    - port: metrics
      scheme: https
      tlsConfig:
        caFile: /etc/prometheus/secrets/etcd-client-cert/ca.crt
        certFile: /etc/prometheus/secrets/etcd-client-cert/client.crt
        keyFile: /etc/prometheus/secrets/etcd-client-cert/client.key
基本警報規則
預構建儀表板是一個起點,但根據您的環境調整的自定義警報規則允許待命工程師在使用者注意到問題之前採取行動。
apiVersion: monitoring.coreos.com/v1
kind: PrometheusRule
metadata:
  name: workload-alerts
  namespace: monitoring
  labels:
    release: kube-prometheus-stack
spec:
  groups:
    - name: pod-health
      rules:
        - alert: PodCrashLooping
          expr: rate(kube_pod_container_status_restarts_total[10m]) > 0.5
          for: 5m
          labels:
            severity: critical
          annotations:
            summary: "Pod {{ $labels.namespace }}/{{ $labels.pod }} is crash-looping"

        - alert: NodeMemoryPressure
          expr: |
            (node_memory_MemAvailable_bytes / node_memory_MemTotal_bytes) < 0.1
          for: 2m
          labels:
            severity: warning
          annotations:
            summary: "Node {{ $labels.node }} memory below 10%"

        - alert: HPAMaxedOut
          expr: |
            kube_horizontalpodautoscaler_status_current_replicas
            == kube_horizontalpodautoscaler_spec_max_replicas
          for: 15m
          labels:
            severity: warning
          annotations:
summary: "HPA {{ $labels.namespace }}/{{ $labels.horizontalpodautoscaler }} at maximum replicas"HPAMaxedOut警報在實踐中特別有價值。當 HPA 長時間固定在最大值時,意味著流量已超出當前上限。您要麼需要提高最大值,要麼增加節點池的容量——並且您想在下一個峰值之前而不是期間瞭解這一點。
生產最佳實踐
Pod 中斷預算
PodDisruptionBudget (PDB) 限制在節點耗盡等自願中斷期間,部署中可以同時不可用的 Pod 數量。如果沒有 PDB,耗盡節點進行維護可能會使整個部署離線。
apiVersion: policy/v1
kind: PodDisruptionBudget
metadata:
  name: api-server-pdb
  namespace: production
spec:
  minAvailable: 2       # or use maxUnavailable: 1
  selector:
    matchLabels:
      app: api-server
拓撲擴充套件約束
預設情況下,排程程式使用盡力而為演算法在節點之間傳播副本。拓撲分佈約束為您提供了副本分佈在可用區域或機架上的硬保證。
topologySpreadConstraints:
  - maxSkew: 1
    topologyKey: topology.kubernetes.io/zone
    whenUnsatisfiable: DoNotSchedule
    labelSelector:
      matchLabels:
        app: api-server
升級策略
RKE2 支援透過系統升級控制器進行滾動升級。您定義一個針對伺服器或代理節點的計劃並指定目標版本;控制器按順序排空、升級和取消封鎖節點。
apiVersion: upgrade.cattle.io/v1
kind: Plan
metadata:
  name: rke2-server-upgrade
  namespace: system-upgrade
spec:
  concurrency: 1
  cordon: true
  nodeSelector:
    matchExpressions:
      - { key: node-role.kubernetes.io/control-plane, operator: In, values: ["true"] }
  serviceAccountName: system-upgrade
  upgrade:
    image: rancher/rke2-upgrade
  version: v1.29.4+rke2r1
etcd 備份和恢復
RKE2 可以自動拍攝預定的 etcd 快照。確保它們寫入叢集外部的持久儲存(S3 儲存桶或遠端 NFS 安裝),而不是控制平面節點上的本地磁碟。
# /etc/rancher/rke2/config.yaml additions for automated snapshots
etcd-snapshot-schedule-cron: "0 */6 * * *"    # every 6 hours
etcd-snapshot-retention: 10
etcd-snapshot-dir: /mnt/nfs/etcd-snapshots

# Manual snapshot
rke2 etcd-snapshot save --name pre-upgrade-$(date +%Y%m%d)

# Restore from snapshot (run on a single server node with cluster stopped)
rke2 server --cluster-reset --cluster-reset-restore-path=/path/to/snapshot.db
結論
使用 RKE2 的擴充套件基礎設施不是單一的配置更改 - 它是一個必須一起設計和操作的互鎖功能系統。水平 Pod 自動縮放可處理工作負載級別的短暫流量突發。垂直 Pod 自動縮放可以使資源請求隨著時間的推移保持誠實。叢集自動縮放器可確保底層節點容量跟蹤 pod 自動縮放器的總需求。節點池和拓撲約束可確保工作負載落在正確的硬體上。資源配額和限制範圍可以保護租戶免受彼此的影響。 PodDisruptionBudgets 和拓撲擴充套件約束強化了可用性。 Prometheus 和 Grafana 使您的團隊能夠在發生故障之前檢測到效能下降。
RKE2 之所以能在生產中佔據一席之地,正是因為它交付的該堆疊的很大一部分是經過預硬化和預整合的。您的責任是瞭解這些旋鈕,根據您的工作負載特徵調整它們,並構建操作規程(執行手冊、警報路由、升級節奏、備份驗證),將配置良好的叢集轉變為真正可靠的平臺。